패키지 설치
Blazor 프로젝트에 암호화와 인증을 위해 아래의 패키지들을 설치한다.
•
Microsoft.AspNetCore.Components.Authorization
•
System.IdentityModel.Tokens.Jwt
•
Blazored.SessionStorage
AuthenticationStateProvider 구성
Blazor 페이지에서 현재 사용자가 인증 상태에 따라 화면을 다르게 보여주기 위해 사용자가 인증 되었는지를 판별하는 태그로 <AuthorizeView>를 사용하는데, 이 태그를 사용하려면 AuthenticationStateProvider 클래스를 상속 받는 클래스를 구현해야 한다.
우선 Blazor 프로젝트에 아래의 클래스를 생성한다.
public class AuthStateProvider : AuthenticationStateProvider
{
private readonly ISessionStorageService sessionStorage;
public AuthStateProvider(ISessionStorageService sessionStorage)
{
this.sessionStorage = sessionStorage;
}
// 최로 로딩할 때 불리는 함수. session storage에 저장된 토큰이 있었으면 가져와서 인증한다.
public override async Task<AuthenticationState> GetAuthenticationStateAsync()
{
var savedToken = await sessionStorage.GetItemAsync<string>("TokenAuth");
ClaimsIdentity claimsIdentity = new ClaimsIdentity();
if (!string.IsNullOrWhiteSpace(savedToken))
{
string token = new JwtSecurityTokenHandler().ReadJwtToken(savedToken).RawData;
claimsIdentity = new ClaimsIdentity(token);
}
ClaimsPrincipal claimPrincipal = new ClaimsPrincipal(claimsIdentity);
return await Task.FromResult(new AuthenticationState(claimPrincipal));
}
// 사용자 로그인이 성공했을 때 사용
public void MarkUserAsAuthenticated(IEnumerable<Claim> claims)
{
ClaimsIdentity claimsIdentity = new ClaimsIdentity(claims: claims, authenticationType: "bearer"); // .NET 4.5 이후 생성자에 문자열 --아무 문자열이든 상관 없음-- 을 넣어줘야 IsAuthenticated가 true가 됨.
ClaimsPrincipal claimPrincipal = new ClaimsPrincipal(claimsIdentity);
// 인증 상태 변화를 알린다.
NotifyAuthenticationStateChanged(Task.FromResult(new AuthenticationState(claimPrincipal)));
}
// 사용자가 로그아웃 했을 때 사용
public void MarkUserAsLoggedOut()
{
ClaimsIdentity claimsIdentity = new ClaimsIdentity();
ClaimsPrincipal claimPrincipal = new ClaimsPrincipal(claimsIdentity);
// 인증 상태 변화를 알린다.
NotifyAuthenticationStateChanged(Task.FromResult(new AuthenticationState(claimPrincipal)));
}
}
C#
복사
이렇게 만든 클래스는 Program.cs에 등록해 줘야 한다. 인증 관련 내용을 추가하는 김에 SessionStorage를 사용하기 위한 것도 추가해 준다.
// AuthenticationStateProvider 클래스 추가
builder.Services.AddScoped<AuthenticationStateProvider, AuthStateProvider>();
// 권한 부여 관련 서비스 추가
builder.Services.AddOptions();
builder.Services.AddAuthorizationCore();
// blazor에서 seesion storage를 사용하기 위한 서비스 추가
builder.Services.AddBlazoredSessionStorage();
C#
복사
서비스 구성
다음으로 Blazor Client에서 Web API Server에 네트워크로 연결하기 위한 Service를 구성한다.
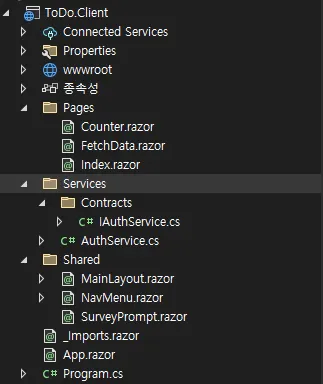
관례에 따라 Blazor 프로젝트에 Services 폴더를 만들고, 그 하위에 Contracts 폴더를 만든 후에 Contract 하위에는 IAuthService 인터페이스를 만들고, Services 하위에는 AuthService 클래스를 만든다.
IAuthService 인터페이스는 아래와 같이 구성한다.
public interface IAuthService
{
Task<bool> Register(string email, string name, string password);
Task<bool> RegisterAdmin(string email, string name, string password);
Task<bool> Login(string email, string password);
Task<bool> Logout();
}
C#
복사
AuthService는 IAuthService를 상속받아 구현하고, 생성자에서 HttpClient 파라미터로 받는다.
public class AuthService : IAuthService
{
private readonly HttpClient httpClient;
private readonly AuthStateProvider authStateProvider;
private readonly ISessionStorageService sessionStorage;
public AuthService(HttpClient httpClient, AuthenticationStateProvider authenticationStateProvider, ISessionStorageService sessionStorage)
{
this.httpClient = httpClient;
this.authStateProvider = (AuthStateProvider)authenticationStateProvider; // AuthenticationStateProvider은 구현한 AuthStateProvider 클래스로 변환
this.sessionStorage = sessionStorage;
}
}
C#
복사
사용자 등록은 아래와 같이 구현한다.
// 일반 사용자
public async Task<bool> Register(string email, string name, string password)
{
try
{
DtoRegister register = new DtoRegister() { Email = email, UserName = name, Password = password };
HttpResponseMessage response = await this.httpClient.PostAsJsonAsync<DtoRegister>("api/auth/register", register).ConfigureAwait(false);
if (response.IsSuccessStatusCode)
{
return true;
}
else
{
string message = await response.Content.ReadAsStringAsync().ConfigureAwait(false);
throw new Exception(message);
}
}
catch (Exception)
{
// Log exception
throw;
}
}
// admin 사용자
public async Task<bool> RegisterAdmin(string email, string name, string password)
{
try
{
DtoRegister register = new DtoRegister() { Email = email, UserName = name, Password = password };
HttpResponseMessage response = await this.httpClient.PostAsJsonAsync<DtoRegister>("api/auth/registerAdmin", register).ConfigureAwait(false);
if (response.IsSuccessStatusCode)
{
return true;
}
else
{
string message = await response.Content.ReadAsStringAsync().ConfigureAwait(false);
throw new Exception(message);
}
}
catch (Exception)
{
// Log exception
throw;
}
}
C#
복사
로그인은 다음과 같이 구현한다
public async Task<bool> Login(string email, string password)
{
try
{
DtoLogin login = new DtoLogin() { Email = email, Password = password };
HttpResponseMessage response = await this.httpClient.PostAsJsonAsync<DtoLogin>("api/auth/login", login).ConfigureAwait(false);
if (response.IsSuccessStatusCode)
{
if (response.StatusCode != HttpStatusCode.NoContent)
{
DtoLoginResult? result = await response.Content.ReadFromJsonAsync<DtoLoginResult>().ConfigureAwait(false);
if (result != null)
{
// 발급 받은 Token은 session storage에 저장해 둔다.
await this.sessionStorage.SetItemAsync("TokenAuth", result.Token);
// 이걸 해야 이후 서버에 요청 보낼 때 인가가 됨.
this.httpClient.DefaultRequestHeaders.Authorization = new AuthenticationHeaderValue("bearer", result.Token);
// token을 읽어서 claims을 추출하고 그 정보를 AuthenticationProvider에게 보내 인증 정보를 업데이트 한다.
IEnumerable<Claim> claims = new JwtSecurityTokenHandler().ReadJwtToken(result.Token).Claims;
this.authStateProvider.MarkUserAsAuthenticated(claims: claims);
return true;
}
}
return false;
}
else
{
string message = await response.Content.ReadAsStringAsync().ConfigureAwait(false);
throw new Exception(message);
}
}
catch (Exception)
{
// Log exception
throw;
}
}
C#
복사
로그아웃은 다음과 같이 구현한다.
public async Task<bool> Logout()
{
// session storage에 저장된 token 정보를 지운다.
await this.sessionStorage.RemoveItemAsync("TokenAuth");
// header를 비운다.
this.httpClient.DefaultRequestHeaders.Authorization = null;
// AuthenticationProvider에게 인증 정보를 초기화 시킨다.
this.authStateProvider.MarkUserAsLoggedOut();
return true;
}
C#
복사
이렇게 만든 Service의 인터페이스와 클래스는 Program.cs에 등록해 줘야 한다. —이렇게 등록만 해주면 Server와 통신하는 것은 등록된 Server URL을 이용해서 ASP가 알아서 해준다.
builder.Services.AddScoped<IAuthService, AuthService>();
C#
복사
사용자 인증 페이지 구성
App.razor 수정
구현한 인증 정보를 사용하기 위해 App.razor 파일을 아래와 같이 AuthorizeRouteView 태그를 사용하는 형태로 업데이트 한다.
<Router AppAssembly="@typeof(Program).Assembly">
<Found Context="routeData">
<AuthorizeRouteView RouteData="@routeData" DefaultLayout="@typeof(MainLayout)" />
</Found>
<NotFound>
<CascadingAuthenticationState>
<LayoutView Layout="@typeof(MainLayout)">
<p>Sorry, there's nothing at this address.</p>
</LayoutView>
</CascadingAuthenticationState>
</NotFound>
</Router>
XML
복사
LoginDisplay.razor 추가
화면 상단에 Login/ Logout 버튼을 보여주기 위해 Shared에 LoginDisplay.razor를 만들고 아래와 같이 AuthorizeView 태그를 사용하여 구현한다.
@using Microsoft.AspNetCore.Components.Authorization
<AuthorizeView>
<Authorized>
Hello, @context.User.Identity.Name!
<a href="LogOut">Log out</a>
</Authorized>
<NotAuthorized>
<a href="Register">Register</a>
<a href="Login">Log in</a>
</NotAuthorized>
</AuthorizeView>
XML
복사
MainLayout.razor 수정
기본 MainLayout.razor 파일에 구현한 LoginDisplay 페이지를 보여주도록 수정한다.
@inherits LayoutComponentBase
<div class="page">
<div class="sidebar">
<NavMenu />
</div>
<main>
<div class="top-row px-4">
<LoginDisplay />
<a href="https://docs.microsoft.com/aspnet/" target="_blank">About</a>
</div>
<article class="content px-4">
@Body
</article>
</main>
</div>
XML
복사
FetchData.razor 파일 수정
최종적으로 인증 구현을 테스트 하기 위해 FetchData 내용을 수정한다. 이 페이지는 Web API의 WeatherForecastController와 연결되는 페이지로, 해당 컨트롤러에서 [Authorize] 특성을 부여한 후 잘 동작하는지 확인하도록 아래와 같이 코드를 수정한다.
@page "/fetchdata"
@inject HttpClient Http
@using ToDo.Shared.DTO
<PageTitle>Weather forecast</PageTitle>
<h1>Weather forecast</h1>
<p>This component demonstrates fetching data from the server.</p>
@if (!string.IsNullOrWhiteSpace(this.ErrorMessage))
{
<div class="alert alert-danger" role="alert">
@this.ErrorMessage
</div>
}
else if (this.forecasts == null)
{
<p><em>Loading...</em></p>
}
else
{
<table class="table">
<thead>
<tr>
<th>Date</th>
<th>Temp. (C)</th>
<th>Temp. (F)</th>
<th>Summary</th>
</tr>
</thead>
<tbody>
@foreach (var forecast in this.forecasts)
{
<tr>
<td>@forecast.Date.ToShortDateString()</td>
<td>@forecast.TemperatureC</td>
<td>@forecast.TemperatureF</td>
<td>@forecast.Summary</td>
</tr>
}
</tbody>
</table>
}
@code {
private DtoWeatherForecast[]? forecasts;
string ErrorMessage { get; set; } = string.Empty;
protected override async Task OnInitializedAsync()
{
try
{
this.forecasts = await Http.GetFromJsonAsync<DtoWeatherForecast[]>("WeatherForecast");
this.ErrorMessage = string.Empty;
}
catch (Exception ex)
{
this.ErrorMessage = ex.Message;
}
}
}
C#
복사
사용자 등록 페이지 구성
Register 모델 정의
사용자 등록 기능을 구현하기 앞서 우선 Register 모델을 아래와 같이 정의한다. 이 모델은 Client에서만 사용하는 것이므로 Blazor 프로젝트에 Models 폴더를 만들고 추가한다.
public class ModelRegister
{
[Required]
public string UserName { get; set; }
[Required]
[EmailAddress]
public string Email { get; set; }
[Required]
[StringLength(100, ErrorMessage = "The {0} must be at least {2} and at max {1} characters long.", MinimumLength = 6)]
[DataType(DataType.Password)]
public string Password { get; set; }
[DataType(DataType.Password)]
[Compare("Password", ErrorMessage = "The password and confirmation password do not match.")]
public string ConfirmPassword { get; set; }
}
C#
복사
Register 클래스 정의
Blazor의 razor 페이지에서 다뤄야 할 코드가 많아지면 해당 코드를 별도의 클래스로 분리하면 관리하기에 좋다. Blazor 프로젝트의 Pages 폴더에 Register.razor.cs 클래스를 생성하고 class 앞에 partial 키워드를 붙여준다. —razor 파일의 이름.razor.cs 라는 이름으로 만들면 알아서 두 파일을 연결해 준다.
public partial class Register
{
[Inject]
IAuthService AuthService { get; set; }
[Inject]
NavigationManager NavigationManager { get; set; }
protected ModelRegister RegisterModel { get; set; } = new ModelRegister();
protected string ErrorMessage { get; set; } = string.Empty;
protected async Task HandleRegistration()
{
try
{
var result = await this.AuthService.Register(email: this.RegisterModel.Email, name: this.RegisterModel.UserName, password: this.RegisterModel.Password).ConfigureAwait(false);
if (result)
{
// login에 성공하면 login 페이지로 이동한다.
this.NavigationManager.NavigateTo("/login");
}
this.ErrorMessage = string.Empty;
}
catch (Exception ex)
{
this.ErrorMessage = ex.Message;
// log Exception
}
}
}
C#
복사
만일 ComponentBase를 상속 받는 클래스에서 참조해야 하는 서비스가 있다면 위와 같이 [Inject] 특성을 이용하여 참조할 수 있다. 이 경우 해당 서비스는 프로퍼티로 선언되어야 한다.
추가로 razor 페이지는 이 클래스를 상속 받아 구현하기 때문에 razor 페이지에서 사용되는 속성이나 메서드는 protected로 선언해야 한다.
Register.razor 파일 정의
구현한 Register.cs 를 이용한 razor 파일은 아래와 같이 구현한다. —RegisterBase에서 선언한 Register 모델을 바인딩하고, Validation까지 점검한다.
@page "/register"
<h1>Register</h1>
@if (!string.IsNullOrWhiteSpace(this.ErrorMessage))
{
<div class="alert alert-danger" role="alert">
@this.ErrorMessage
</div>
}
else
{
<div class="card">
<div class="card-body">
<h5 class="card-title">Please enter your details</h5>
<EditForm Model="this.RegisterModel" OnValidSubmit="this.HandleRegistration">
<DataAnnotationsValidator />
<ValidationSummary />
<div class="form-group">
<label for="name">UserName</label>
<InputText Id="userName" class="form-control" @bind-Value="this.RegisterModel.UserName" />
</div>
<div class="form-group">
<label for="email">Email address</label>
<InputText Id="email" class="form-control" @bind-Value="this.RegisterModel.Email" />
<ValidationMessage For="@(() => this.RegisterModel.Email)" />
</div>
<div class="form-group">
<label for="password">Password</label>
<InputText Id="password" type="password" class="form-control" @bind-Value="this.RegisterModel.Password" />
<ValidationMessage For="@(() => this.RegisterModel.Password)" />
</div>
<div class="form-group">
<label for="password">Confirm Password</label>
<InputText Id="password" type="password" class="form-control" @bind-Value="this.RegisterModel.ConfirmPassword" />
<ValidationMessage For="@(() => this.RegisterModel.ConfirmPassword)" />
</div>
<button type="submit" class="btn btn-primary">Submit</button>
</EditForm>
</div>
</div>
}
C#
복사
로그인 페이지 구성
Login 모델 정의
사용자 등록과 비슷하게 로그인 페이지도 구성한다. 우선 Login 정보를 처리할 모델을 정의한다.
public class ModelLogin
{
[Required]
[EmailAddress]
public string Email { get; set; }
[Required]
[DataType(DataType.Password)]
public string Password { get; set; }
}
C#
복사
Login 클래스 정의
사용자 등록과 비슷하게 Login.razor.cs 클래스를 정의한다.
public partial class Login
{
[Inject]
IAuthService AuthService { get; set; }
[Inject]
NavigationManager NavigationManager { get; set; }
protected ModelLogin LoginModel { get; set; } = new ModelLogin();
protected string ErrorMessage { get; set; } = string.Empty;
protected async Task HandleLogin()
{
try
{
var result = await this.AuthService.Login(email: this.LoginModel.Email, password: this.LoginModel.Password).ConfigureAwait(false);
if (result)
{
this.NavigationManager.NavigateTo("/");
}
this.ErrorMessage = string.Empty;
}
catch (Exception ex)
{
this.ErrorMessage = ex.Message;
// log Exception
}
}
}
C#
복사
Login.razor 파일 정의
사용자 등록과 비슷하게 Login.razor 파일을 구성한다.
@page "/login"
<h1>Login</h1>
@if (!string.IsNullOrWhiteSpace(this.ErrorMessage))
{
<div class="alert alert-danger" role="alert">
@this.ErrorMessage
</div>
}
else
{
<div class="card">
<div class="card-body">
<h5 class="card-title">Please enter your details</h5>
<EditForm Model="this.LoginModel" OnValidSubmit="this.HandleLogin">
<DataAnnotationsValidator />
<ValidationSummary />
<div class="form-group">
<label for="email">Email address</label>
<InputText Id="email" Class="form-control" @bind-Value="this.LoginModel.Email" />
<ValidationMessage For="@(() => this.LoginModel.Email)" />
</div>
<div class="form-group">
<label for="password">Password</label>
<InputText Id="password" type="password" Class="form-control" @bind-Value="this.LoginModel.Password" />
<ValidationMessage For="@(() => this.LoginModel.Password)" />
</div>
<button type="submit" class="btn btn-primary">Submit</button>
</EditForm>
</div>
</div>
}
C#
복사
로그아웃 페이지 구성
사용자 등록이나 로그인과 다르게 로그아웃 자체는 별다른 데이터가 필요하지 않다. 간단하게 아래와 같이 Logout.razor 페이지만 구성한다.
@page "/logout"
@inject IAuthService AuthService
@inject NavigationManager NavigationManager
@code {
protected override async Task OnInitializedAsync()
{
await AuthService.Logout();
NavigationManager.NavigateTo("/");
}
}
C#
복사
여기까지 했으면 .NET의 Identify를 이용한 사용자 등록과 로그인/로그아웃, JWT를 이용한 인증, 인가 등이 구현된 상태이다. 실제로 프로젝트를 테스트 해보면서 잘 동작하는지 확인하고, Web API에서 WeatherForecastController에 [Authorize], [Authorize(Roles = UserRole.ADMIN)] 등을 붙여 보면서 권한 관리도 잘 되는지 확인해 보자.
시리즈
이 글은 아래와 같은 시리즈로 이루어짐